Category: Home

Ceaco Thomas Kinkade Disney The Little Mermaid Falling in Love Jigsaw Puzzle Review

I recently took a little break from working on jigsaw puzzles to begin my adventures in diamond painting. When I found the Ceaco Thomas Kinkade Disney – The Little Mermaid Falling in Love puzzle at the thrift store, I knew it would be the perfect project for when I needed a diamond painting break. This beautiful puzzle is based on a Thomas Kinkade painting, and features our favorite characters from the Disney animated classic The Little Mermaid. Let me tell you why this jigsaw puzzle was so much fun to put together!

This post includes affiliate links and a referral link. All opinions are my own. See my Disclosure Policy for more information.

This puzzle is one of many designs in the Ceaco Thomas Kinkade Disney collection. It has 750 pieces, and measures 24″ x 18″ when completed. It comes in a square box that is easy to stack and store. As mentioned, I found this at my local thrift store. It was brand new and just $2.99! The puzzle retails for $14.99 on the Ceaco website, or $12.99 on Amazon. Ceaco puzzles are Made in the USA. Unlike the Peggy’s Garden puzzle I reviewed recently, this one does not say it is made with recycled materials, so I must assume it’s not.

The first thing I noticed when working on this puzzle is that the individual pieces feel a lot sturdier than the previous Ceaco puzzle I completed. I also did not have a problem with the image peeling away from the cardboard. However, several of the pieces were not fully cut when I opened the box, and I had to separate them myself. These pieces also do not lock together, so it’s very challenging to move sections around while working because they just fall apart.

Despite the pieces falling apart easily, it was an absolute joy to put together this puzzle! I began with sorting the pieces, and was able to put together Flounder, Eric, and Ariel right from the start. I then moved onto the edge, and worked my way around the border with the castle, ship, and coral sections. The sky was my favorite section to complete! I felt like pieces were going in so easily as I reached for them!

The most challenging part of this puzzle is the blue water. That being said, the art has many hints in the water that help guide the puzzling along. For example, King Triton and his castle can be seen in the water, as well as different schools of fish. The water also has different shades of blue that I used to help me sort through the pieces. I ended up putting small sections of light blue together before adding them to the main puzzle.

I also love how this puzzle features so many different elements from The Little Mermaid. While Ariel and Eric are the main focus of the image, you can see that Ursula is spotted in the scene along with Sebastian’s crustacean band. I really enjoyed finding all of the different details in the image as I worked on the puzzle!

Just like the last Ceaco puzzle I completed, this one comes with a high quality print of the puzzle image. This allowed me to use both boxes for sorting. I definitely referred to the picture a lot while working on the blue water area in particular.

Pros & Cons

Pros:

  • Beautiful artwork
  • Sturdy pieces
  • Quick and fun to complete
  • Included print out of image
  • Made in USA

Cons:

  • Pieces do not lock together
  • False fits (happened twice)
  • Some pieces not fully cut through during manufacturing

Final Thoughts

I am so glad I found this puzzle at the thrift store! I completed it in one weekend, and had such fun doing so. Even though the water was a bit difficult, I never felt frustrated or stuck. Plus, there were a lot of unique elements in the artwork that I enjoyed discovering. I think this is a great puzzle for beginners and Disney fans alike! Ceaco is continuing to be a budget-friendly (even at retail price!) puzzle company.

Follow me on Instagram @PolishlandReads to see more of my puzzle adventures!

The Woobles Rainbow Billy the Unicorn Crochet Kit Review

I’ve never purchased from an Instagram ad before, but after seeing The Woobles pop up in my feed for several months, I decided to take the plunge. The Woobles is a company that sells beginner friendly crochet kits specializing in amigurumi, the Japanese art of crocheting small, stuffed animals. I’ve crocheted for nearly 20 years, but I’ve never mastered amigurmi. In fact, I find working on these small projects quite frustrating! That being said, when I saw the cute Rainbow Billy the Unicorn design, I knew I had to make it as a gift for my unicorn-loving niece. In this post I will share my experience with The Woobles, and whether or not I think it’s worth the price tag.

First, let’s talk about what comes in The Woobles crochet kits. I appreciate that the kits contain all of the tools you need to make your project:

  • Yarn
  • Stuffing
  • Crochet Hook
  • Eyes
  • Weaving Needle
  • Stitch Markers
  • PDF pattern and video tutorials

This kit is a beginner level, and recommended for ages 12+. It comes in a really cute and resealable holographic bag. I have a full unboxing video on Instagram if you want to see the materials up close.

The materials themselves were good quality. The yarn is advertised as “Easy Peasy yarn, custom-made for beginners.” I actually found that it separated quite easily, and was a bit too large for the crochet hook provided at 4mm. I also had a huge clump in my white yarn. It is common to see a small knot in yarn skeins due to the manufacturing process, but this knot was tricky to get around on such a small project. That being said, I actually really liked the crochet hook. The rubbery handle was very comfortable to hold compared to the metal hooks I typically use.

When it comes to the crochet process, I appreciate that we get both the PDF of the pattern and the step-by-step tutorial videos. Because I already know how to crochet, I used the pattern and would only use the videos when needed. The videos were very helpful, and I did refer to them quite a bit. However, it was surprising that in most of the videos the instructor was using a very different texture of yarn, and working on a separate project. It would be more helpful if the instructor was working on the same project in the kit.

The crocheting itself went relatively smoothly for me. What I do not like about amigurumi, however, are all the tiny parts that have to get sewn onto the project. For Rainbow Billy, the arms, ears, horn, mane, bangs, and cheeks are all separate parts that have to be sewn onto the main section (here, the head). I find it super frustrating to make these little bits and connect them together. The sewing aspect is challenging, and it never looks quite right for me (as seen in this top-down view of Billy’s head). My poor little Billy looks a little wonky!

I completed my Rainbow Billy in about 5 hours. The packaging states that this project will take 3-8 hours. I honestly think if you’ve never crocheted before, this will take you even longer as you try to learn all the stitches through the videos.

Additionally, I am surprised with how many supplies were left over when the project was completed. I have a good amount of yarn and stuffing, as seen in the above photo. While it’s great that The Woobles gives you sufficient materials, I think they could easily reduce what is provided so we do not end up with any waste. This would also save the company money.

Speaking of price, this kit costs $30.00. At first, I suffered a bit of sticker shock when I saw the website listing. However, I do think this is a fair price. If I were to buy all of the included materials from Joann Fabrics, it would cost me $25.00 before shipping. Of course, that price does not include the pattern and tutorial videos included with The Woobles. Thus, if you are looking to try crocheting without accumulating a lot of materials, this is a great way to do it.

Overall, I think The Woobles Rainbow Billy the Unicorn crochet kit is a fun crafting project. That being said, I do not plan on purchasing from this company again. I just don’t enjoy the amigurumi process, and prefer to work on other projects like scarves and blankets. However, if you would like to dip your toes into the crochet world, this is a great way to do that! The Woobles offers a variety of amigurumi kits on their website. I am very glad I gave this company a try, and my niece really loves her little stuffed unicorn made by her aunty!

Visit my Etsy Shop to purchase scarves, blankets, and other items crocheted by me!

Ceaco Peggy’s Garden Fanciful Jigsaw Puzzle Review

My jigsaw puzzle craze continues with another review of a puzzle I completed! I found the Ceaco Peggy’s Garden Fanciful puzzle at the thrift store for $3.00. I was excited to discover that it was still brand new when I got it home! I love flowers, and the bright colors on the box are such a cheery image. It may be snowing outside right now, but I can at least imagine a sunny, floral atmosphere with my puzzle!

This post includes an affiliate link. All opinions are my own. See my Disclosure Policy for more information.

Ceaco makes a few different versions of Peggy’s Garden, with this one being the Fanciful edition. This is a 1000 piece puzzle that measures 26.6″ x 19″ when completed. It comes in a square box that is small and easy to store. Just as with the White Mountain puzzle I completed recently, this puzzle is Made in the USA in my native New England – this time in Massachusetts! I once again love that the brand uses recycled materials to make their puzzles. This puzzle typically retails for $12.99, but it’s currently on sale on Ceaco’s website for $4.99! It is also available on Amazon.

The pieces themselves are made of cardboard, and they measure on the smaller side. I did have issues with the image peeling a bit off of the backing whenever I would try a piece in the wrong spot. It’s almost like the pieces would get stuck together! The image is high quality, but it is a bit glossy, which reflected the sunlight when I worked on the puzzle during the day. I needed to get right over the pieces to avoid glare.

All of that being said, the pieces fit together really well, and it was obvious whenever I put a piece in the wrong spot. It can be tricky to move sections of the puzzle around, though, as the pieces do not lock together strongly. I carefully slid sections around, and only moved small groupings at a time.

In terms of difficulty, I found this puzzle to be quite the challenge! I began with the edge, and then moved onto the middle of the flowers that have the small dots at the center. I then built out the flowers from there, and kept working outwards. The leaves in various shades of green came last! Once I got the flowers done, the rest moved pretty quickly, and it was satisfying to see everything come together so nicely.

One thing I absolutely loved about this puzzle is the included poster of the puzzle image. This allowed me to use both sides of the box for sorting. I definitely used the image to help me lay out many of the pieces, specifically the colored circles in the background. I appreciate that the colors in the print match the puzzle exactly!

Pros & Cons

Pros:

  • Beautiful artwork with vibrant colors
  • High quality image
  • Included print out of image
  • Made in USA of recycled materials

Cons:

  • Pieces do not lock together well
  • Image peels off easily
  • Glare due to glossy finish
  • Puzzle dust

Final Thoughts

Overall, I really enjoyed putting together the Ceaco Peggy’s Garden Fanciful puzzle. It was a nice challenge for me, and the issues I did have with the pieces did not detract from the puzzling experience too much. Instead, it just felt more like a “budget” puzzle, which makes sense since the original price is $12.99. I will definitely keep my eye out for more Ceaco puzzles!

Follow me on Instagram @PolishlandReads to see more of my puzzle adventures!

White Mountain Puzzles Tapestry Cat Jigsaw Puzzle Review

After YouTube recommended the channel Karen Puzzles to me, I’ve rediscovered how much I enjoy jigsaw puzzles. I’ve decided that 2023 is going to be the year that I allow myself to spend time doing cozy and crafty hobbies. I thought it would be fun to document the different puzzles and projects I complete here on the blog. That way, I can look back and see all of the fun creations I put together, all while sharing my thoughts on the products with you. Let’s jump right into the first jigsaw puzzle I completed this year from White Mountain Puzzles called Tapestry Cat!

This post includes affiliate links. All opinions are my own. See my Disclosure Policy for more information.

I purchased the White Mountain Puzzles Tapestry Cat by Lewis T. Johnson on Poshmark, but it is available on the brand’s website and Amazon for $19.99. This is a 1000 piece puzzle that measures 24″ x 30″ when completed. I absolutely love that the puzzle is Made in the USA in my native New England! The box also reads that the puzzle is made with recycled materials, which is awesome as well.

The pieces are made of a nice, sturdy cardboard. I did have a few issues with false fits, or pieces fitting in places where they don’t belong. Thankfully, the colors on the puzzle are very clear and rich, so when I took a closer look I was able to see my mistakes and rectify them. I appreciated that the pieces lock together well, so I could easily move around sections as I worked on them.

I started the puzzle by working on the tapestry section on the outside border. I found this quite challenging! I think I struggled a bit because the pattern repeats itself multiple times. Once I got this section completed, though, the rest went more smoothly for me.

Once I finished the tapestry, I moved onto the cat. I put together the cat’s face and paws, but then quickly moved onto the flowers. The flowers were the most fun for me! I matched up the pieces by color and texture, and used the photo on the box to arrange them on the board. It was so satisfying when all my sections began locking together!

Lastly, I filled in the darker areas around the cat to complete the puzzle. This was a bit tricky, but at this point I didn’t have many pieces left, so it went together quite quickly. The end result is just stunning! I love the beautiful colors, and the cat is darling. I left the puzzle out for a few days because I loved looking at my feline friend. I definitely see myself doing this puzzle again, and perhaps framing it if I ever have a library room.

Pros and Cons

Pros:

  • Sturdy cardboard
  • High quality image
  • Beautiful artwork
  • Large box size (great for sorting!)
  • Pieces lock together well
  • Made in USA of recycled materials

Cons:

  • False fits
  • A bit of puzzle dust (I kept blowing it away)
  • Image on the box is obstructed with writing (I would love a separate poster/print inside!)

Final Thoughts

Overall, I really enjoyed putting together the Tapestry Cat from White Mountain Puzzles! The few cons that I encountered are nit-picky on my end. I will definitely keep my eye out for other designs from this brand. Plus, they have a store in Jackson, NH that I would love to visit one day!

Follow me on Instagram @PolishlandReads to see more of my puzzle adventures!

5 Kitchen Gadgets that Actually Work | Affordable Stocking Stuffer Ideas

Happy Wednesday! Today I’m excited to share with you five kitchen gadgets that actually work. With holiday shopping season now in full swing, I wanted to give you some stocking stuffer ideas. I have used and loved all of the kitchen gadgets featured in this post today, and think anyone who enjoys cooking, or who is looking to learn cooking, will enjoy them as well. What’s better is that all of these products are super affordable and under $15.00 each!

This post includes affiliate links. All images are courtesy of Amazon or The Container Store. All opinions are my own. See my Disclosure Policy for more information.

1. Silicone Garlic Peeler – Set of Two for $5.99 [BUY]

This silicone tube is so amazing at peeling garlic! Simply chop off the end of a garlic clove, stick it in the tube, and roll it on the counter. The clove is peeled in seconds, and it works every time! I got mine at Daiso, but you can easily score one on Amazon. I use a ton of garlic in my cooking, and this has cut down on a lot of peeling time for me. Plus, this is small enough to tuck into any kitchen drawer.


2. Jarkey – $4.99 [BUY]

My mom got me a JarKey for Christmas a few years ago, and I absolutely love using it! This handy little tool opens any jar for you with ease. Simply place it on the edge of a jar and gently push down until you hear a pop. Your jar will then open without any struggle on your part. You no longer need a grip, nor will you stick a jar under warm water to loosen the cover. I honestly get so excited to use my JarKey, and highly recommend it!


3. Veggetti Vegetable Spiralizer – $8.59 [BUY]

The next product is another one I was gifted by my mom a few years ago, and that is the Veggett! Yes, this is an As Seen on TV product, but it truly works. This mini vegetable spiralizer easily creates noodles out of your favorite vegetables. Whether you’re looking for a pasta alternative, or simply want to spiralize veggies for your salad, this Veggetti is awesome to have on hand. I love the small, compact size of this spiralizer, as it is easy to store as opposed to the larger models from competitor brands.


4. OXO Good Grips Pro Y-Peeler – $12.99 [BUY]

This is by far the best vegetable peeler I’ve ever used! Not only does the wide grip fit well in my hand, but the blade works flawlessly. The blade is stainless steel, and it can be replaced in the future should it wear out completely. Plus, this peeler is dishwasher safe! While there are more affordable peelers on the market, I think it’s worth the few extra dollars for this one!


5. OXO Good Grips Water Bottle Cleaning Set – $9.95 [BUY]

I love using reusable water bottles and coffee mugs, but they can be really difficult to hand wash. When my nephew was born, I noticed that my brother and sister-in-law had special brushes to clean his baby bottles. Sure enough, there are brushes for all size bottles! This particular set comes with three different attachments, so you can easy clean any shape and size bottle. Pair this fun brush set with a reusable water bottle, and it makes a nice gift!


That wraps up my top five kitchen gadgets that actually work! I hope this post introduced you to some new products, whether you are grabbing them for a stocking stuffer gift or for yourself. As always, I would love to hear from you in the comments! What are your favorite kitchen gadgets?! I love trying out new tools that help save me time and energy whilst cooking!

My KonMari Journey | Decluttering Paperwork

Happy Wednesday! My KonMari journey continues today with a chat about my experience decluttering paperwork. After dealing with my book collection (see that post HERE), I was ready to tackle some items with which I did not have an emotional connection. While I do own a lot of papers that I consider sentimental, such as letters, cards, and photos, I am saving all of those paper memorabilia items for the end of my KonMari journey when I go through the sentimental category. The paperwork I will be discussing today includes all of the boring stuff – bills and statements, manuals, newspaper and magazine clippings, schoolwork, etc. Let’s talk about decluttering paperwork and how this process went for me!

This blog post will not contain any photographs of my actual paperwork as I wanted to ensure any confidential information was kept private. I do apologize that I cannot share more of this decluttering process with you, but I still wanted to share my thoughts on decluttering papers.

Here’s what my file tote looks like!
Purchase this from Amazon by clicking on the photo (affiliate link).

When I placed all of my paperwork into one large pile through which to sort, I had two piles of old schoolwork, two piles of miscellaneous papers, and one plastic file bin half filled with old papers. I started with all of the papers that were not school related, and found it very easy to weed through them. Marie Kondo recommends keeping only those papers for which there is a clear purpose. She also says it is important to keep a pending box for all of those papers that require your attention, such as bills that need to be paid, recipes you want to try, and cards to bring to the post office. This pending box allows you to keep sorting through your paperwork without attempting to complete any tasks that may interrupt the process. However, it is important to set a date to go through your pending box and complete all of the needed paperwork so it doesn’t sit uncompleted forever.

I couldn’t believe how easy it was to declutter my papers! I had tons of paperwork from when I first applied to college. That was ten years ago now! Why did I originally keep all of the informational brochures and various letters from each school? I separated all of the papers I was discarding into a pile that needed to be shredded and a pile to recycle. After going through all of the papers, I could fit all of them into about one-third of the plastic file tote! This leaves me plenty of space for future tax years, and I might even get a storage box that is half the size once my tidying campaign is over.

When it came to my schoolwork, I did break Marie Kondo’s rules a little bit. She recommends getting rid of all your old coursework, but I decided to keep some of it because I only graduated from law school a couple years ago and am still in the early stages of my career. That being said, I did pay careful attention to what I was keeping and what I could easily recycle. This process took a long time, but in the end my two piles were reduced to one. I even ended up with a spare storage crate!

All in all, tidying papers was much easier than I expected. It took me a total of three hours and forty-three minutes to declutter my paperwork, but the time went by quickly and it was very easy to feel what sparked joy. I recognize that my starting pile of papers was probably smaller than the average person’s, but that is because I only have my papers to deal with and I’m still quite young. Nonetheless, I think tidying your papers will be much easier than you think if you follow the KonMari method! As always, feel free to divide the paperwork category into smaller categories that work for you so you do not get overwhelmed.

How do you store paperwork? Let me know in the comments!

Dollar Tree DIY | Easy Halloween Wreath

Happy Friday! Halloween is just around the corner, and today I am excited to share with you a fabulous and affordable DIY project that will help you celebrate the holiday in style. I recently stopped by my local Dollar Tree store and found everything I needed to put together a cute Halloween wreath. This DIY is easy and quick, but the finished product looks stunning. Plus, since all the supplies you need are at the Dollar Tree, this wreath only costs $6.00 to complete. Let me share with you how to create this spooktacular wreath!

I am not sponsored by or affiliated with Dollar Tree. I simply love shopping at the store and want to share this DIY with you!

WHAT YOU NEED:

  • Floral Garden Metal Wreath Ring (14″ inch wreath form)
  • 4 Rolls Crafter’s Square Decorative Mesh (20 yards of mesh total)
  • Decorative Spiders
  • Hot Glue Gun and Glue Sticks (not pictured)

I found the wreath form in the floral aisle of Dollar Tree, and the decorative mesh in the front of the store with the Halloween items. The mesh comes in black, orange, and purple. I went with two rolls of black and two rolls of orange. I decided to purchase a pack of purple spiders to add to my wreath, but you can grab any decoration of your choice. I went with purple so the spiders would stand out against the black and orange wreath. The one supply I did not purchase at Dollar Tree is a hot glue gun that I used to attach the spiders to the wreath. If you do not have a hot glue gun at home, you can purchase super glue from Dollar Tree to complete the project.

Now it’s time to begin the wreath! I followed THIS YouTube tutorial created by Paige Nicole. She demonstrates how to weave the decorative mesh through the wreath form to create the wreath. This process is very simple, but it does take some time. Set aside 20-30 minutes to complete the wreath. The decorative mesh can be a bit tricky to work with since it sticks to itself, but be patient and take your time during this weaving process. You can always unravel the wreath and start over if you make a mistake! As a guide, I made 5-6 loops in each section of the wreath form to achieve the fullness I liked.

The second and final step is attaching your decorative items to the wreath. I used a hot glue gun to glue my spiders onto the mesh. I planned out where I wanted the spiders to go, and simply glued them onto the wreath. I recommend getting lightweight decorations so they do not weigh down the mesh. As mentioned above, you can also purchase super glue at Dollar Tree if you don’t have a hot glue gun. Once the glue is dry, your wreath is complete! The wreath hangs very easily as well – simply place the top rung of the metal wreath form over a hook.

I am amazed at how easy this Halloween wreath is to make, yet it looks so expensive! In fact, similar wreaths sell on Etsy for $30.00-$50.00, and ours only cost $6.00 to make! This is a great gift to give during the Halloween season, and you can adapt this tutorial for any holiday by using different colored mesh and decorations. I’m so excited to hang this on the front door once October hits!

If you make this wreath, please tag me on Instagram, Twitter, or Facebook so I can see it!

Want more Dollar Tree DIY projects? Let me know in the comments!


My KonMari Journey | Clothing Declutter + Reorganization

Happy Wednesday! Today I am excited to begin a new series here on my blog all about my journey implementing the KonMari method in my life. You may have heard of the famous book The Life-Changing Magic of Tidying Up by Marie Kondo. I recently read its companion book, Spark Joy, in which Marie breaks down her KonMari method and explains step-by-step how to tidy your home. I absolutely fell in love with this book, and I knew I had to begin implementing her method right away. In today’s first post about my KonMari journey, I will quickly share about my decluttering history, and then my process trying the KonMari method for the first time with my clothing.

If you’ve been following my blog for some time, you’ll know that I’ve been simplifying my life for the past two-three years. I’ve spent a lot of time decluttering my belongings, and I’ve shared the process with you when it came to makeup and nail polish. I cannot tell you how many bags of clothing, household goods, books, and more I’ve donated over the past couple years, but I somehow still have more stuff than I need or want. I think this is mainly due to merging all of my college and law school things with everything that I left at my parents house when I moved to school. I will admit that I’ve been a pack rat all my life, finding a lot of meaning in what I deem to be sentimental items. After getting rid of so many belongings on my own, I was ready to read Spark Joy by Marie Kondo and adopt her tidying process. I knew it would give me that final push I needed for all of those items to which I have emotional attachment.

You can learn more about the KonMari method by reading one of her books, but, in essence, it focuses on only keeping items that bring you joy. I absolutely love this tidying method, as there is no room to rationalize about whether or not I need to keep an item. If it doesn’t bring me joy in some way, it needs to go. I’ve decided to follow the KonMari method as closely as I can to see if it can work for me. I know there are many opinions about this method ranging from extremely positive to extremely negative. I see a lot of value in the KonMari method, and am sharing this personal journey with you in hopes that it will inspire you to rethink how you declutter and organize your home as well.

Marie Kondo lays out a specific guide to decluttering, and it begins with clothing. The KonMari method requires you to gather each and every item in a category from everywhere in your home and place it in a giant pile. You then hold every item individually and decide whether or not it sparks joy. I know this might sound a bit ridiculous, but I soon got the hang of it! My first eye-opening experience was looking at my giant clothing pile. I put my clothes on my full size bed, using a spare sheet as a drop cloth. Woah! My pile was HUGE! I did not expect it to be so large, as I think I operate on quite a limited wardrobe. Of course, this pile includes all of my clothing, from socks and underwear, to jeans and tops, to jackets, and so on. Still, I did not anticipate having such a huge pile through which to sift!

Overall, I found the sorting process quite easy. Because I’ve been regularly donating clothes, what was left in my wardrobe were mainly items that sparked joy. I didn’t get rid of too much, but I was able to fill a kitchen sized garbage bag with clothing to donate, create a small pile of clothes I want to sell, and a decent size pile of things to put in the garbage. I like to sell name brand clothing that is in excellent condition on the website ThredUp. While I would ultimately like to donate all the rest, some of my clothing was quite old and damaged. For instance, the t-shirt sitting on the top of the pile is so worn with age there are several holes in the back, and the design is washed out almost completely. Needless to say, those items no longer brought me joy!

Here is a look at everything I kept. While I was, at first, a bit disappointed that I did not get rid of more, I had to remind myself that the quantity of the items does not matter so long as they all bring me joy. I did keep a pair of jeans from Target that I eventually want to replace, so I made a note of that in my planner. I highly recommend keeping a notebook handy so you can record when there is an item you want to repurchase or upgrade in the near future when you have the money.

My next step was to fold and store my clothing using the KonMari folding method. Marie recommends folding as many clothes as you can, and provides detailed instructions on how to achieve the desired result. I admit that it took me quite a while to fold all my clothes, and I often had to refold items before getting the hang of this new-to-me method. That being said, I am beyond thrilled with the result! Not only can I fit a lot more clothes into my drawers, but they are easy to see and access. The above photograph shows my top drawer filled with camisoles, everyday t-shirts, and sweaters. I’m so in love with the look of the drawers, and now that I’ve used this storage method for a little while, I’m happy to say they are also functional and easy to use.

Everything that cannot be easily folded, such as coats, dresses, professional clothing, and fluttery tops, hangs in the closet. Following Marie’s recommendation, I grouped items by category, faced them to the right, and went from long to short. This is completely different from how I used to organize my closet, but I’m really enjoying the result. I got used to this change in just a few days.

The entire process of tidying and storing my clothes took me four hours and ten minutes. I did this on a Sunday and did take breaks! While I was quite tired at the end of the day, I felt very accomplished. Not only did my drawers and closet look amazing, but I already felt more joyful. I definitely think the state of our surroundings impacts our mood, and after completing the first step in my KonMari tidying campaign, I felt awesome.

I hope you enjoyed this first blog post in my new series documenting my KonMari journey with all of you! I will be posting about my tidying campaign every Wednesday on this blog, so make sure to follow so you will see all of my updates! Next week will cover clothing accessories, such as bags, jewelry, scarves, etc. Please let me know in the comments how you liked this blog post, and if there is anything you want me to mention about the KonMari method in my next post.

Buy Spark Joy by Mari Kondo on Amazon HERE to learn more about the KonMari method.

This post includes affiliate and referral links. All opinions are my own. See my Disclosure Policy for more information.


Erin Condren Sherpa Throw Review | Floral Ink Design

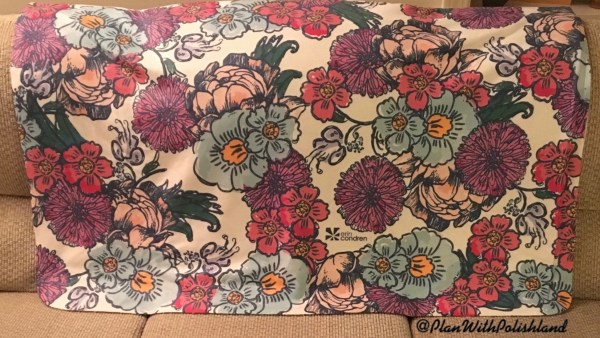
Happy Wednesday! Today I am excited to share my thoughts on the Erin Condren Sherpa Throw blanket with all of you. Erin Condren is my favorite place to purchase planners, and the company has expanded to offer more products for the home including art prints, accent pillows, and throw blankets. I decided to purchase the Sherpa Throw in the design Floral Ink, because I absolutely love blankets and needed a new one for this past winter season. Now that I’ve used the blanket for a few months, I’m ready to share my full review!

The Sherpa Throw currently comes in 15 different designs. I purchased the Floral Ink pattern because I love the color scheme and gorgeous florals. The throw is also available in two sizes: 50″ x 60″ at $55.00 and 60″ x 80″ at $75.00 I went with the smaller size blanket, and it appears to be the average throw blanket size. In the photo above, the blanket is folded in half and draped over a couch. The product is 100% polyester, and is machine washable and dryable.

The difference in blanket color is due to the lighting in each photograph. The blanket did not change color after being washed.

The Sherpa Throw shipped to me from a third-party, and separate from the other Erin Condren products I ordered at the same time. I was disappointed that I did not receive a tracking number for the blanket, but it arrived quickly and in perfect condition. The blanket was beyond luxurious when it first arrived. I loved how soft and fluffy the underside of the blanket was, and the top felt so velvety and smooth to the touch. The Sherpa Throw is also really warm and cozy – just what I wanted for the cold winter months! Unfortunately, I did notice a big change in the blanket after washing it. Despite following the washing instructions exactly, the once-fluffy underside became matted after its first wash, and a bit more matted after its second. The top also lost its velvety smooth feeling. While the blanket is still in great condition and extremely warm and comfortable, I am disappointed that it lost all of its fluffy texture. Nonetheless, I still think the Sherpa Throw is beautiful, and I will happily continue using it.

All in all, I think the Erin Condren Sherpa Throw is a great product, but I do think the price tag is too high when I think about the comparable products that can be purchased at stores like Marshalls and Target for more affordable prices. Of course, I also think it is disappointing that the texture of the blanket changes so much after each washing. In the end, I do recommend this product if you are able to afford the price, or if you get it during a sale. I still really love my Floral Ink throw, and I would consider purchasing more in the future if I wanted a specific design for a room in my home.

Save $10 off your first Erin Condren purchase by using my referral link HERE.


My Favorite Christmas Tree Ornaments!

Happy Thursday, and Happy Christmas Eve to all of you who celebrate! I thought it would be fun if I took you on a little tour of my family’s Christmas Tree today by sharing some of my favorite ornaments with you. We have a lot of ornaments on the tree, and there is a huge variety. I, of course, have certain ornaments that are important to me for different reasons. Let me show you some of my favorite Christmas Tree ornaments!

My Favorite Christmas Tree Ornaments! | Adventures in Polishland

Minnie Mouse

My Favorite Christmas Tree Ornaments! | Adventures in Polishland

Let’s begin with my Minnie Mouse collection! I’ve been a huge Minnie Mouse fan for my entire life, and that is certainly reflected on the Christmas Tree. I’ve received several Minnie ornaments as gifts over the years, and I’ve picked up a couple on my own, too. I’m showing you two of my many Minnies in this post. I know the personalized one came from my parents, but I have no clue where I got the other one. It’s vintage at this point!

Barbie

My Favorite Christmas Tree Ornaments! | Adventures in Polishland

Another one of my ornament collections is my Barbie collection! Hallmark has put out a few different Barbie series during my lifetime, and I’ve gotten one every year since 1993 (except for last year, when there wasn’t a Barbie released). You can see my first-ever Barbie on the left, and my Barbie from this year on the right. These ornaments are so special to me, and I hope to continue getting a Barbie ornament every year. One day I hope to have a Barbie tree that is hot pink!

The Hunchback of Notre Dame

My Favorite Christmas Tree Ornaments! | Adventures in Polishland

This next ornament is special to me not because I love the film The Hunchback of Notre Dame, but because this was the first purchase I ever made in Disney World! My family went to Disney World for the first time when I was in first grade, and we went to Magic Kingdom on the first night when we arrived. I got this at Ye Olde Christmas Shoppe in Liberty Square for $4.95 (yes – the price tag is still on the box!). I saved up all my birthday money for our Disney trip, and was so excited to spend it on souvenirs galore. That first night in Disney World was so magical for me. I will never forget when Minnie Mouse waved to me during the parade! This ornament represents that magic even 20 years later.

Boston Celtics

My Favorite Christmas Tree Ornaments! | Adventures in Polishland

Last but not least, I’ve always been a huge Celtics fan, and my parents got me this engraved ornament a few years back. It’s the only Celtics ornament I have, and I love putting it on the tree. It’s so classy, and I love that it’s handmade as well!

That wraps up my post on my favorite Christmas Tree ornaments! I hope you enjoyed this mini tour of my tree! Please share your favorite ornaments with me in the comments, or tag me on social media in a photo. I’d love to see your ornaments! I hope you and your family have a very Merry Christmas!