Tag: nails

Zoya Naturel Satins Collection | Transitional 2015

Happy Thursday! I am beyond excited today to show you the brand new Zoya Natural Satins Collection! This line of six nail polishes has a unique satin finish that is somewhere between matte and glossy. They are designed to provide opaque coverage that lasts longer than your typical matte manicure, while still looking flawless and super chic. I shrieked when these beauties arrived to me for review, and you’ll see why when I show you the swatches. The Naturel Satins are stunning!

Zoya Naturel Satins Collection | Adventures in Polishland

Zoya – Ana Zoya – Ana
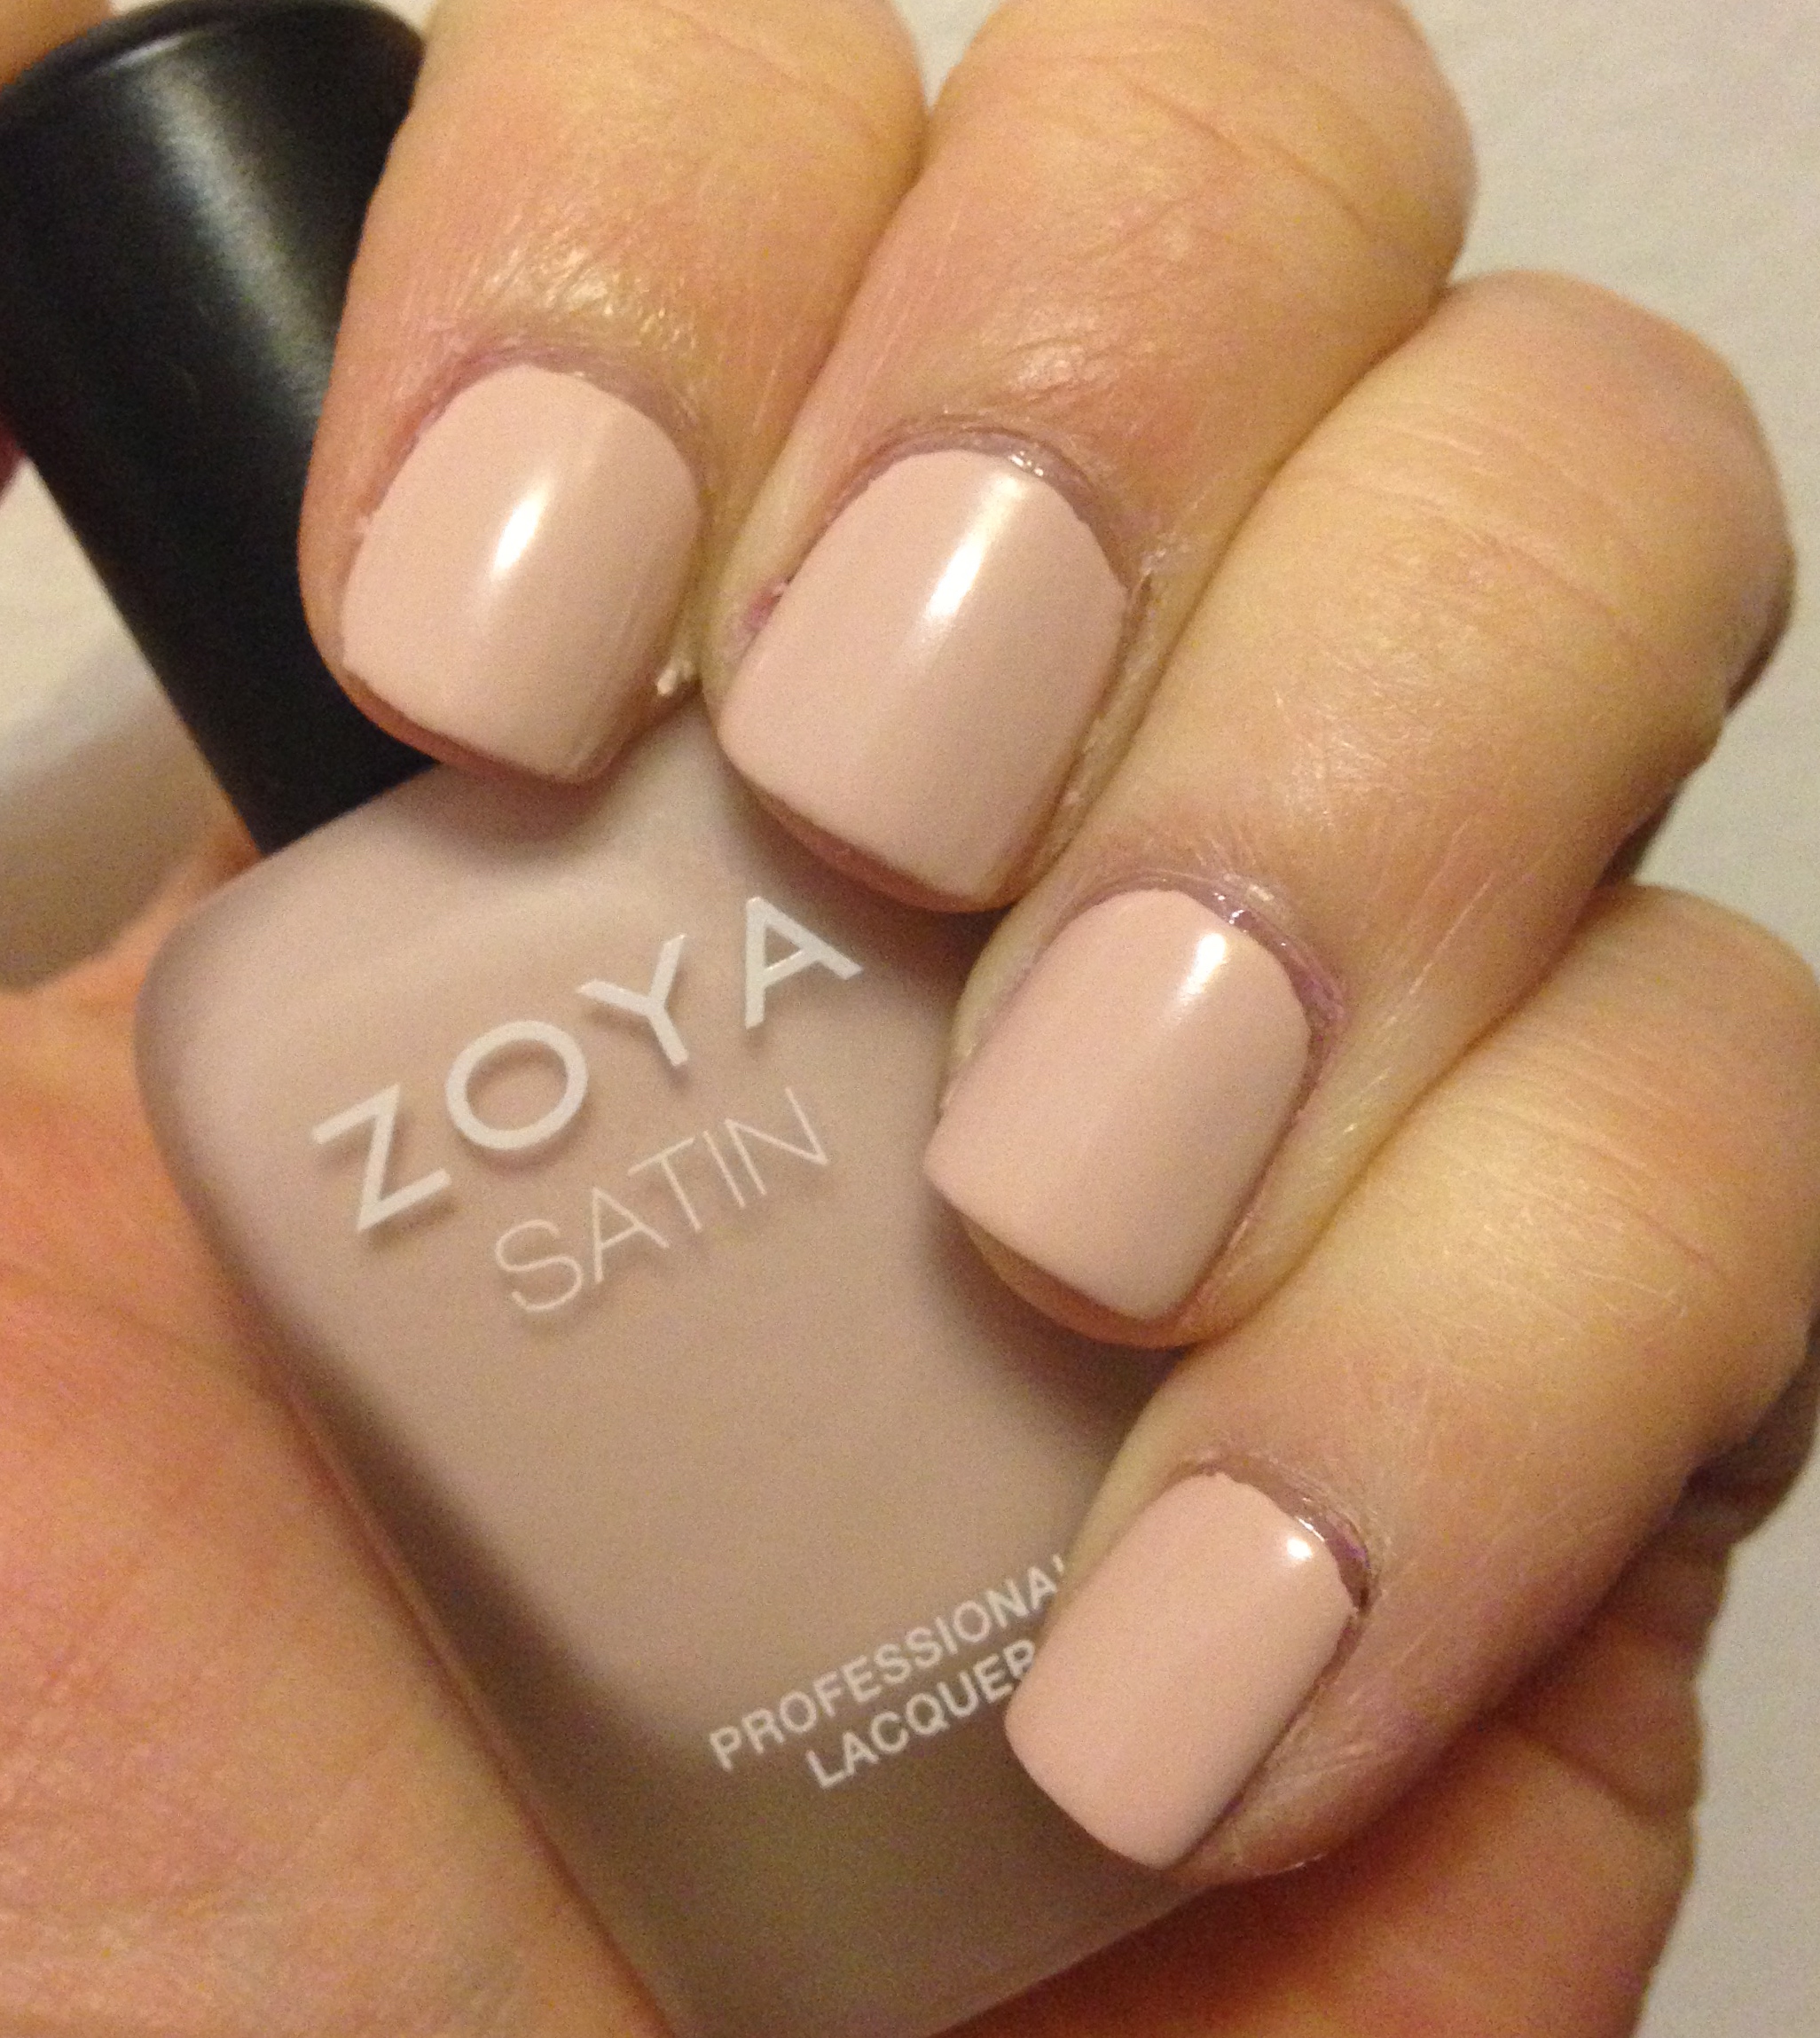
First up is Ana, what Zoya describes as a light almond shade. Ana has a great formula that is opaque in two coats. The Satins have a very unique formula. When you apply them, you think they are going to dry streaky, but as they dry they magically transform into a smooth and flawless finish. Ana is no exception, and I love this unique color.

Zoya – Rowan Zoya – RowanNext up is Rowan, a light brown polish Zoya describes as a suede taupe. Rowan also has a perfect formula that is opaque in two coats. I can’t get over how chic these Satin polishes look on me! I would never think to put on a taupe polish for daily wear, but Rowan has changed my mind!

Zoya – Sage Zoya – SageSage is up next, and it is a gorgeous sage green polish. I really love green polishes, and Sage is no exception! Again, it has a great formula that is opaque in two coats. Sage is also an on-trend color for this time of year (I’ve seen people rocking sage fashion all over NYC!).

Zoya – Leah Zoya – LeahNext up is Leah, a Satin polish with just a hint of purple pigmentation. Leah is also opaque in two coats, and has the flawless Satin formula. I love the muted color of this polish, as it is so classy and work appropriate while still being a purple nail polish!

Zoya – Tove Zoya – ToveZoya Tove is another really unique shade! It is a slate grey polish with blue undertones. I applied two coats in the photos above, and I’m loving how it looks. Tove is edgy yet feminine at the same time!

Zoya – Brittany Zoya – BrittanyLast but not least is Brittany, a beautiful rose mauve polish, and my favorite in the Satins Collection! I saved Brittany to swatch last because I knew this just had to be my daily manicure of the moment. I’m wearing it as I type up this post! Of course, Brittany has a perfect formula that is opaque in two coats. If you get only one polish from this collection, I highly recommend Brittany!

All in all, I am beyond in love with the Zoya Naturel Satins Collection! As this is Zoya’s transitional line this year, these six polishes can help bring you from winter to spring in style. Each polish has an amazing formula and stunning finish. I can’t recommend them to you enough! You can purchase these polishes on Zoya’s website HERE for $9 each or $54 for the set. Please let me know in the comments which Satins you’ll be picking up!

The products in this post were provided for my unbiased review. All opinions are my own. See my Disclosure Policy for more information. 

Striping Tape Nail Art featuring Sally Hansen Lustre Shine Moonstone

Happy Monday! I’ve been trying to reach into my nail polish collection and use polishes that I haven’t picked up in a while. This weekend I was drawn in by Sally Hansen Lustre Shine in the shade Moonstone. I decided to create a cool, punk inspired nail art look. Let me show you the final product!

Striping Tape Nail Art featuring Sally Hansen Lustre Shine Moonstone Striping Tape Nail Art featuring Sally Hansen Lustre Shine MoonstoneWHAT YOU NEED:

  • Black Nail Polish – Michael Marcus Once You Go Matte
  • Opalescent Nail Polish – Sally Hansen Lustre Shine Moonstone [BUY]
  • Glossy Top Coat – Essie Good to Go [BUY]
  • Striping Tape [BUY]
  • Scotch Tape [BUY]

To create this awesome manicure, I began by painting my nails with a black base. Then, I applied two coats of Moonstone over the black and let that dry completely. I then used striping tape to create a double “X” on every nail except my accent nail. Once the striping tape was in place, I painted over it with the black polish and carefully peeled off the tape. For the accent nail, I simply used Scotch tape and left a triangle on the base of my nail. Last but not least, I used a glossy top coat and applied two coats to each nail once my polish was completely dry. This evened out the layers and left me with a shiny finish.

Striping Tape Nail Art featuring Sally Hansen Lustre Shine MoonstoneAll in all, I am absolutely loving this funky manicure! It was so easy to create and it allowed me to use some of my older polishes in a new way. This look can be adapted to fit your personal tastes by changing up the colors or the patterns. I love experimenting with tape! Please let me know in the comments if you like my manicure, and let me know if you like using striping tape, too.

Some of the products in this post were provided for my unbiased review. Some of the links in this post are affiliate links. All opinions are my own. See my Disclosure Policy for more information. 

Pinspiration | Neutral & Gold Manicure + Using Your Textured Polishes in a New Way!

Happy Tuesday! I’ve really been into Pinterest lately, and spotted THIS beautiful accent nail that I just had to recreate. Neutrals are really great in the winter months, but the pop of gold sparkle added a classy yet fabulous touch to the manicure. I searched through my nail polish collection to see which shades matched the Pin best, and to my surprise the best full coverage gold glitter I owned was a textured formula. I decided to make it work! Let me show you the results!

Step 1: Paint Your Nails with a Nude Beige Polish

Milani – Vanilla AlmondI chose Milani Vanilla Almond (review HERE), but you can use whatever polish you own. Make sure you let this base dry completely before moving onto step two. I actually let my manicure dry overnight, but to be safe I think 1-2 hours will be satisfactory depending on the formula of the polish and the humidity of your location.

Step 2: Apply Tape to Nail and Paint an Off-White Diagonal

Color Club – Mod in ManhattanI’ve used the tape trick since my blog’s inception. Simply take a small piece of tape, press it on the back of your hand to remove some of the stickiness, then place on your nail. Paint over the tape and remove while the polish is still wet. I use Color Club Mod in Manhattan (review HERE) as my off-white polish. If you only own a white, that will work, too!

Step 3: Apply Tape on Opposite Side of Nail and Paint a Gold Glitter Diagonal

JulieG – Gift of GoldFinally, repeat the above step with the tape on the opposite side of your nail. Again, make sure to let step two dry completely before moving on. As you can see from my manicure, I didn’t wait for my polish to dry enough and had to touch up the lines. For my gold glitter I chose JulieG Gift of Gold. This is a textured polish, but it was the most full coverage of all my gold glitters. To achieve a glossy finish, I simply applied Essie Good to Go over the entire nail! I’m loving the finished product!

All in all, it is super easy to create this neutral and gold manicure so long as you have a bit of patience with the drying process. Of course, you can use any nail polish colors you wish to recreate this look, but I think this color palette is stunning. Even though textured polishes may not be on trend anymore, you can still find ways to use those that you purchased in nail art and by applying a glossy top coat. Please let me know in the comments if you’ll be recreating this look!

Some of the products in this post were provided for my unbiased review. All opinions are my own. See my Disclosure Policy for more information. 


5 Marsala Nail Polishes You Already Own | Pantone Color of the Year 2015

Happy Sunday! Now that 2015 is in full swing, it’s time to embrace the new Color of the Year! Every year, Pantone deems one color shade to be the Color of the Year. This year is Marsala, an earthy wine red that looks to me like a deep, dusty mauve. You can read all about Marsala on the Pantone website HERE, but today I’ll be talking about Marsala nail polishes! I’ve raided my own nail polish stash to find the shades that match up best with 2015’s new color. Let me show you the five Marsala nail polishes that you might already own!5 Marsala Nail Polishes You Already Own! | Adventures in Polishland

Milani Color Statement Nail Lacquer 

Milani – Mauving Forward

Mauving Forward [REVIEW] [BUY]

Mauving Forward is an affordable polish that fits nicely within the Marsala family. It definitely has some purple undertones, but the pigmented formula is great. Plus, this new range from Milani can easily be found online or at your local CVS store.

Milani Limited Edition Textured Creams

Milani – Mystery Mauve

Mystery Mauve [REVIEW]

If you purchased Mystery Mauve from the limited edition Textured Creams collection last fall you are in luck! It is a great Marsala shade, plus it has that fun textured feel. Time to dig out your bottle from last year!

Zoya Naturel Collection

Zoya – Normani

Normani [REVIEW] [BUY]

If you prefer more muted nails, try Normani. It’s a bit lighter than Marsala, but still similar to that gorgeous hue. I highly recommend this shade for those with a fair skin tone!

Zoya Naturel Deux Collection

Zoya – Aubrey

Aubrey [REVIEW] [BUY]

Another great pick is from the second Zoya Naturel line. Aubrey is a much more pigmented mauve, and is one of the closest matches I have to a true Marsala in my collection. Aubrey is also a polish that can be worn in any season.

Julep 

Julep – Aisha

Aisha [REVIEW] [BUY]

Finally, if you prefer more of a bold shade try Aisha. It’s definitely brighter than Marsala and has some berry tones to it, but it’s for sure in the Marsala family. Try adding a matte top coat to soften the look if you want.

All in all, as Pantone embraces a new Color of the Year we can reach into our nail polish collections to find our own Marsala polishes. There is no need to splurge on new releases (though you are more than welcome to do so if you wish!). Even if you don’t have a perfect Marsala match, any mauve shade will do. Leave your favorite Marsala polishes in the comments so I can know what you’ll be rocking in 2015!

Some of the products in this post were provided for my unbiased review. This post contains an affiliate link. All opinions are my own. See my Disclosure Policy for more information.

My First Manicure in 2015 featuring Maybelline Color Show Holographic in Blue Blaze!

Happy Friday! It’s now 2015 and that means another year of new manicures! Last year I posted about 2014’s first manicure (see that review HERE), so I figured it was fitting that I continue the tradition. I raided Momma Polishland’s nail polish stash again and discovered a lone Maybelline Color Show polish from the Holographic Collection. I decided to put it to the test to see if a drugstore brand can get that holographic formula right!

Maybelline Color Show Holographic – Blue Blaze Maybelline Color Show Holographic – Blue BlazeBlue Blaze is a silvery-blue polish with a metallic formula. It does have some holographic shimmer mixed throughout the base, but I would not call this a holographic polish at all. The formula felt just like a metallic – it was patchy and pulled easily. However, it did build up well. I applied three thin coats to get the look you see pictured. I am happy with the result, but I would definitely label this polish a metallic and not a holographic.

Maybelline Color Show Holographic – Blue Blaze

I took these pictures in direct sunlight to ensure that any holographic effects would be captured. As you can see, there is a bit of shine, but no strong rainbow prism effect. Thus, while this is a good polish with a unique color, it does not compare with the holographic formulas we know and love.

You can find Maybelline Color Show Holographic in Blue Blaze for sale on Amazon HERE for about $4.50. I’m quite interested to know your experience with this range of polishes if you’ve tried them. Did you get a strong holographic effect, or did they apply more like a metallic for you as well? Let me know in the comments!

This post contains an affiliate link. All opinions are my own. See my Disclosure Policy for more information.


My Top 14 Nail Polishes of 2014!

Happy Wednesday! As the year comes to a close, I wanted to reflect on all of the amazing nail polishes I got to try for all of you. I went through each and every blog post I wrote this year and found the nail polishes I loved the most. These are the polishes that I wore over and over, and the ones I highly recommend to you. Let me go ahead and share my Top 14 Nail Polishes of 2014!

My Top 14 Nail Polishes of 2014! | Adventures in Polishland

Milani Gold Label Specialty Nail Lacquer

Milani – Splendid Strawberry

Splendid Strawberry [REVIEW] [BUY]

Milani had a great 2014 when it came to new nail polish lines. The year began with some beautiful shades in the Gold Label Specialty Nail Lacquer Collection. I’m a sucker for pinks, and Splendid Strawberry is a perfect one. Plus, it has a great retail price of just $4.19.

Milani High Speed Fast Dry Nail Lacquer

Milani – Blue Zoom

Blue Zoom [REVIEW] [BUY]

Milani really outdid themselves with the stunning bright blue that is Blue Zoom. This highly pigmented polish is another one of my favorite manicure hues. It is just so fabulous!

Milani Nail Lacquer

Milani – WhiteWhite [REVIEW] [BUY]

I’ve tested a lot of white polishes this year, and a good reliable one is from Milani. Just look at that smooth finish! Whether you are looking to use a white for nail art, a glitter base, or just on its own, you can’t go wrong with this one at $4.99.

Zoya Awaken Collection

Zoya – Cole

Cole [REVIEW] [BUY]

The polish I got the most use out of throughout 2014 is definitely Cole. I wore this beautiful peach shade several times ever since it first arrived to me. It is work appropriate, yet still not your typical neutral. I have a sizable dent in my bottle!

Zoya Tickled Collection

Zoya – WendyWendy [REVIEW] [BUY]

Zoya also came out with a great pink shade this year. Wendy is a melon shade that also has a coral feel to it. The brightness pops in the summer sun, and it is a great go to polish.

L’Oreal Paris Miss Denim Collection

L'Oreal – Jean & Tonic

Jean & Tonic [REVIEW]

Textured nail polishes fizzled out a bit in 2014, but I spotted the limited edition Miss Denim collection by L’Oreal at drugstores and had to grab a couple. I love this turquoise shade, and wore it many times this summer. It is long lasting, and very flattering on my fair skin tone.

Milani Color Statement Nail Lacquer

Milani – Hot Pink Rage

Hot Pink Rage [REVIEW] [BUY]

Milani continued to make 2014 a memorable nail polish year by releasing the new Color Statement line. Hot Pink Rage was a stand out for me because of its flawless formula and wearable color. If you are looking for the perfect pink, this is it! Plus, this range is an affordable $3.99 each.

Milani Color Statement Nail Lacquer 

Milani – Blue Print

Blue Print [REVIEW] [BUY]

My last Milani favorite of the year is Blue Print, another beyond-amazing blue. This is a bit deeper in pigmentation than Blue Zoom. I’m sure you can tell I love this color family!

Julep

Julep – Katie

Katie [REVIEW] [BUY]

I didn’t end up using Julep much this year, but Katie was definitely a stand out for me. The shade is unique and very beautiful. The subtle shimmer is just gorgeous, and I know it would look good on every skin tone (not just mine!).

Zoya Entice Collection

Zoya – Ryan

Ryan [REVIEW] [BUY]

As we transitioned from summer to fall, I grabbed those dark polishes right away. I’ve really come to love dark nails, which is quite funny because when I began this blog I was all about the brights and pastels! Ryan is such a divine polish with its deep indigo shade.

NYC New York Color Fashion Queen Collection

NYC New York Color – Queen of the City

Queen of the City [REVIEW]

I’m sure you are sick of me mentioning Queen of the City by now – I think I’ve featured it at least three times on my blog since I got it! But really, this polish is fantastic. The deep, almost duochrome shade is one-of-a-kind. It’s a shame it was limited edition!

NYC New York Color Fashion Queen Crystal Couture Collection

NYC New York Color – Queen's Jewels

Queen’s Jewels [REVIEW] 

I also don’t wear glitter as much as I used to, but this full coverage green is so awesome! I’ll be wearing this during the holidays for many years to come, even though this was a fall line. Did you snag one before it disappeared?!

Zoya Matte Velvet Collection

Zoya – Savita Savita [REVIEW] [BUY]

This year Zoya re-released the Matte Velvet line, and I got to try them for the first time. I absolutely love matte finishes, and these formulas are great options. Savita is a really nice purple. It’s my favorite in the line for sure.

NYC New York Color Midnight Beauty Collection

NYC New York Color – Black Elixir

Black Elixir [REVIEW]

Not only did I discover a great white polish this year, but I found a stunning black as well! I can’t get over how this super affordable NYC New York Color polish is so flawless. It is a great reminder that lower priced items can sometimes be amazing quality.

All in all, I’ve discovered some great new nail polishes in 2014! I’m quite surprised that my top brands are Milani, Zoya, and NYC New York Color! I reach for them more than anything else it seems. What about you? Please share your favorite polishes of 2014 in the comments, and let me know which brands you wore most often this year.

Some of the products in this post were provided for my unbiased review. This post contains an affiliate link. All opinions are my own. See my Disclosure Policy for more information.

Simple Saturday | Julep Cloud Manicure

Happy Saturday! Now that Christmas is over, I took the time to paint my nails after going a week without any polish. I rather enjoy short nails, and after doing so much housework the past week to get ready for holiday get-togethers, I actually enjoyed chopping them down. Since I am separated from my nail polish stash at the moment, I raided Momma Polishland’s collection (with her permission, of course). She’s grown quite a substantial pile of polishes in the past few years – that seems to happen when your daughter is a nail polish blogger, even if she’s moved out of the house! Let me show you the quick and easy nail art look I created.

Julep Dianna | Adventures in PolishlandI began with a base of Julep Dianna, a stunning navy polish. Dianna has a great formula, and I applied two thin coats to achieve opacity. This was easily done very fast – I forgot that Julep switched to wide, flat brushes! They can be tricky at first, but really easy to use once you get the hang of the feel.

Julep Cloud Manicure | Adventures in PolishlandFor an accent nail, I grabbed Julep Briana, a mint shade that leans towards blue. I thought Briana looked perfect when paired with Dianna! I simply used the cloud nail art technique (full details on how to create the clouds HERE). The creme formulas look amazing, and the blue tones are wintery yet no longer holiday themed. I applied a glossy top coat to finish the look, and I was good to go!

All in all, I am really happy with my simple manicure. It looks fancy with the cloud accent nail, but was so easy to create. You can actually grab Briana for just $4.99 on Julep’s website HERE in the Savvy Deals section today. If you spend $25 or more from now until December 28, you get a free gift worth $50 with promo code SAVVY. This is definitely a great bargain! Be sure to let me know in the comments what you think of my manicure, and if you are picking up anything during Julep’s sale. Also, don’t forget to enter my 3rd Annual New Year’s Eve Manicure Contest! Details on how to enter HERE.

Julep Beauty Inc.

This post contains affiliate links. All opinions are my own. See my Disclosure Policy for more information. 

3rd Annual New Year’s Eve Manicure Contest!

Happy Friday! I hope you are all having a wonderful holiday season! Today I am excited to announce my 3rd Annual New Year’s Eve Manicure Contest! Make sure to read all of the rules below so you can enter to win some awesome prizes!

RULES

Who is eligible to enter?

  • US residents who are 18+ years old or have parental consent
  • You must be following Adventures in Polishland to enter – either through email or Bloglovin’
  • Bloggers and non-bloggers may enter

What kind of manicures are allowed?

  • Anything goes! Nail art, glitter, plain polish – I’m leaving this one up to you!
  • For inspiration, see past years’ entrants HERE and HERE

How does the contest work?

  • Create your manicure, and email me a photo of your nails to adventuresinpolishland@gmail.com with the subject line “NYE Manicure Contest”
  • You may include in your email 1-3 sentences describing your manicure, and why you think it’s great for New Year’s Eve (optional)
  • The deadline for submitting your manicure is Monday, January 5, 2014 at 11:59pm EST
  • On January 6, I will post all of the manicures in a photo album on my Facebook Page
  • On January 12, winners will be chosen and notified via email.

How will winners be chosen?

  • There are two winners in this giveaway!
  • One winner will be chosen by popular vote – whichever manicure receives the most Facebook likes (remember, the likes must be on the photo posted on my Facebook Page).
  • One winner will be chosen by a panel of objective judges based on which manicure is their favorite.

PRIZES

Each winner will receive a limited edition tin from Makeup by One Direction. One winner will receive the Niall tin and the other will receive the Liam tin. A full review containing the products can be seen HERE. I absolutely love the Makeup by One Direction nail polish!

Makeup by One Direction Tins | Adventures in PolishlandEach winner will also receive bonus beauty products selected by me. Stay tuned for more details! You never know what can pop up as prizes.

I hope you will consider entering my New Year’s Eve Manicure Contest! It is a fun way for me to give back to all of you, and a great opportunity for your nails to shine after seeing mine all the time. If you have any questions regarding this contest, please don’t hesitate to email me at adventuresinpolishland@gmail.com. I hope you are having a wonderful holiday season!

Pinspiration | Snowman Nail Art

Happy Thursday! Today I have a nail art look to show you based on a photo I saw on Pinterest. I saw THIS adorable manicure and just had to recreate it to the best of my abilities. If you’ve been reading Adventures in Polishland for a while, you’ll know that I struggle big time with nail art. I simplified this snowman a little for my skill level. Let me show you the result!

Zoya – NeveI began with a base of Zoya Neve (full review HERE). Neve is a stunning deep blue/purple polish with blue and purple shimmer mixed throughout the base. I wanted a darker background color for my snowman, because I love looking at snow at night. There is just something beautiful about it! Plus, I thought Neve’s shimmer would be great as a base as well.

Snowman Nail Art | Adventures in PolishlandOnce Neve was completely dry, I got going with my nail art! My first step was grabbing the dotting tools I got from Amazon (buy them HERE). I made some big dots and some smaller dots with white nail polish for the snowflakes. Then I used the regular nail polish brush, and painted the tips of my nails white for the snow banks. This was beyond easy to do, and it looks awesome! My little snowman was a bit more difficult. I did some freehand circles for his body and let that dry. Then, I used a black striper polish for his top hat and some dotting tools helped me create his eyes and buttons. I ran out of room for Mr. Snowman’s carrot nose, but I grabbed an orange polish and put it on there anyway. Finally, I used a red polish to make the snowman a scarf. Once everything was completely dry, I finished up with a top coat.

http://amzn.to/1AivORnAll in all, even though my little snowman isn’t perfect, I’m still really happy with my final manicure. The snowflake nails came out really well! I think with more practice I will get the hang of the snowman. He sure is cute, though! Please let me know in the comments if you like this wintery manicure and if you’ll be trying it out this year. If there are any nail art looks you want me to test out for you, let me know that as well. I hope you’re having a great holiday season!

Some of the products in this post were provided for my unbiased review. This post contains an affiliate link. All opinions are my own. See my Disclosure Policy for more information. 

My 2014 Holiday Manicures! | 3 Nail Polish Looks

Happy Tuesday! Today I wanted to show you the three manicures I’ve worn so far this holiday season. I’ve already reviewed some of these polishes, so I will leave links to those blog posts alongside each manicure. I hope these nail polish looks bring you some inspiration as we head into the New Year! That reminds me – stay tuned for an exciting announcement very soon about my Annual New Year’s Eve Manicure Contest! For now, let me show you my 2014 holiday manicures.

NYC New York Color – Queen of the City

NYC New York Color – Queen of the City [REVIEW]

I started off the holidays with a red that isn’t so “in your face” Christmas. I really love Queen of the City because of its unique shade and shimmery formula. It looks amazing with my fair skin tone, and goes with a ton of different outfits as well. If you’re looking for an edgier manicure this holiday, grab a deep shade like this one.

Zoya – Giovanna Zoya – Giovanna [REVIEW]

Next I went for more of a true Christmas color with an emerald green polish. Giovanna is just perfect for this time of year! It’s festive but still really classy. You can also use Giovanna for nail art as well. I do recommend a nice layer of base coat with this polish, though, as it tends to stain a bit.

Glitzology – Island of Misfit Toys

Glitzology – Island of Misfit Toys 

Chrome Girl – Birthday Suit [REVIEW]

Finally, I am currently wearing a combination of Island of Misfit Toys and Birthday Suit. I got this Glitzology polish two years ago, but never used it! Unfortunately, this indie polish brand is now out of business, but to create a similar look use a glitter polish that contains fine silver glitters and larger multi-colored glitters. Feel free to use multiple glitter polishes if necessary! I decided to go with a pastel pink base so that all of the glitters would really stand out. It’s not quite your typical Christmas manicure, but I’m thrilled with the result!

I hope you enjoyed seeing my holiday manicures so far in 2014! Please let me know if you liked this post in the comments. I’d be happy to show off any more nail polish looks I put together through the holiday season. Of course, I want to see your holiday manicures as well. Please share a photo on my Facebook Page HERE or feel free to use the hashtag #PolishlandPresents so I can find your posts on any social media site. I hope you are all having a wonderful holiday season!

Some of the products in this post were provided for my unbiased review. All opinions are my own. See my Disclosure Policy for more information.