January 2014 Favorites!

Happy Thursday! January is quickly coming to a close, and it’s time for me to share some of the things I’ve been loving this month with all of you. I don’t have too many beauty favorites this month, since I’ve been keeping it rather natural in the new year. Nonetheless, here are my January 2014 favorites!

NAIL POLISH

Milani – Sugar RushMilani Nail Polish in Popping Pink and Sugar Rush [REVIEW 1] [REVIEW 2]

As you may have guessed, I am just obsessed with the new Milani Gold Label polishes that will be in CVS stores starting in February. My favorite combination is one coat of Sugar Rush over Popping Pink. This manicure is so fun, and I love everything about these polishes. I highly recommend them!

BLUSH

NYC Cheek Glow – Riverside Rose
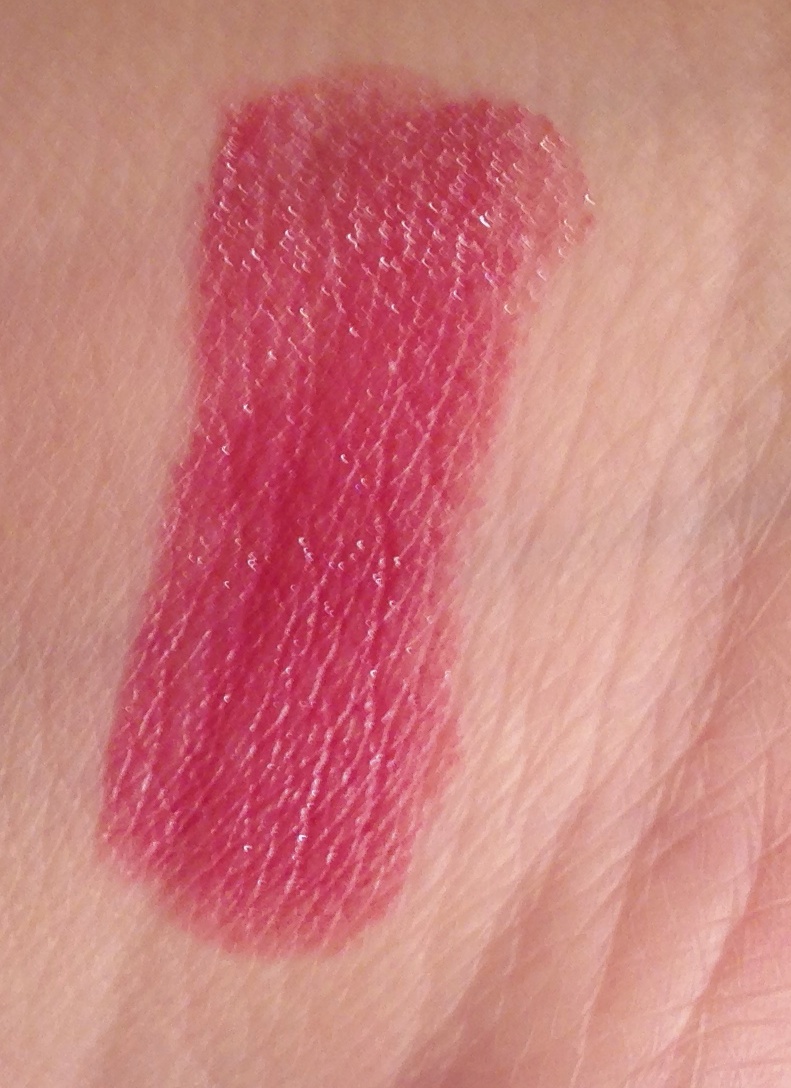
NYC Cheek Glow in Riverside Rose [BUY]

I recently picked up this blush from NYC at Rite Aid during a sale event (see my haul post HERE), and I’m so impressed! The color is just right for my skin tone, and it looks so natural. I can’t believe this costs just $2.99! Run to the drugstore and grab this now!

MASCARA

L'Oreal Voluminous Butterfly MascaraL’Oreal Voluminous Butterfly Mascara [REVIEW] [BUY]

It’s probably no surprise at this point that I love this new mascara from L’Oreal! As much as I love trying out different mascaras, I am rushing to finish the other ones in my stash so I can wear this every day! The wand is beyond amazing, and the formula is perfect for my lashes. Every mascara fan needs this one in her collection!

HAIR

Got2b Guardian AngelGot2b Guardian Angel Heat Protectant [BUY]

I purchased this heat protectant several weeks ago during a sale event at CVS. I had a coupon, so I figured I would give this a try at a low price. I’m so glad I picked it up! My hair has never looked more smooth or shiny (yet not greasy). Since I straighten my hair most days, this heat protectant is tailored to my needs as well.

BODY LOTION

Nivea Extended Moisture Body LotionNivea Extended Moisture Body Lotion [REVIEW] [BUY]

As soon as I returned to NYC after my winter break, I couldn’t wait to grab my Nivea lotion. It really is my all-time favorite body lotion thus far. Not only does it work, but it doesn’t have an annoying scent. Keep an eye out for coupons in the Sunday paper for added savings!

FOOD

Trader Joe's Peanut Butter Filled PretzelsTrader Joe’s Peanut Butter Filled Pretzels

I grabbed these pretzels at TJ’s and quickly devoured the bag. In fact, I may have polished off the remnants while I’ve been writing this post… whoops. These may not be the healthiest snack in the world, but at least I know that they’re all natural. I think I’m going to hold off on buying another bag for a while, though. I just don’t have any self control when it comes to these goodies!

MUSIC

Justin Timberlake | The 20/20 Experience 2 of 2The 20/20 Experience – 2 of 2 by Justin Timberlake [BUY]

I’ve been listening to JT’s latest album nonstop lately. Granted, everything he touches turns to gold in my eyes, but this album is fantastic! I love the entire thing, but my favorite songs are Not a Bad Thing and Murder. If you don’t have this album yet, you should definitely buy it!

That’s it for my January favorites! I hope you enjoyed seeing what I’m currently loving, and please share your favorites with me as well. Leave your thoughts in the comments, or use hashtag #PolishlandFaves on social media.

Some of the products in this post were provided for my unbiased review. This post contains affiliate links. All opinions are my own. See my Disclosure Policy for more information.

Pinspiration | Dry Brush Technique featuring Milani Gold Labels

Happy Tuesday! I was loving the new Milani Gold Label Specialty Nail Lacquers so much that I knew I had to create a nail art look with them. I browsed through my Nail & Beauty Inspiration Board on Pinterest for ideas, and settled on the Dry Brush Technique. I first learned of this nail art method on The Lacquerologist back in December, and Pinned the blog post for later. I love the easy tutorial that Emily created, and knew I’d be trying it out at some point. Let me show you the look I created!

Dry Brush Nail Art Dry Brush Nail ArtTo create this bright and funky manicure, I followed Emily’s tutorial and used polishes from the new Milani Gold Label line. I began with a base color of Popping Pink, and used Vivid Violet, Power Periwinkle, and Sugar High with the dry brush technique. I sealed the look with butter LONDON’s Hardwear Topcoat, and I really love the final result! The look was so easy to create, and the bright colors go so well together. Plus, I couldn’t resist adding in a bit of glitter, too.

Dry Brush Nail ArtAll in all, I’m so glad I tried out the dry brush technique after seeing it on The Lacquerologist! It’s simple, yet looks really cool. The possibilities are endless as well, so I’ll definitely have to try this again in the future! Let me know in the comments if you’ve ever tried this technique, or if there are any nail art designs you would like me to test out on Adventures in Polishland.

The products in this post were provided for my unbiased review. This post contains an affiliate link. All opinions are my own. See my Disclosure Policy for more information.

New Milani Gold Label Specialty Nail Lacquer for 2014 | Part 2 of 2

Happy Sunday! Today I have part two of the new Milani Gold Labels to share with all of you. If you missed the bright creme shades, make sure you check them out HERE! Each of the creme shades has a corresponding glitter top coat that goes along with it. Of course, they can be mixed and matched, but I decided to review them as a pair. Each manicure in this post is sealed with butter LONDON’s Hardwear Topcoat, and features one coat of glitter. Let me show you these gorgeous glitters!

Milani – Sugar Coated Milani – Sugar CoatedFirst up is Sugar Coated layered over Showy Sea-Green. Sugar Coated has lime green bar glitters and lime hexagons in both small and medium sizes. There is also a sprinkling of holographic glitter mixed throughout for an added sparkle. I’m really impressed with the amount of glitters that apply to the nail in one coat. The mono-color effect is really unique as well!

Milani – Sugar Rush Milani – Sugar RushNext up is Sugar Rush over Popping Pink. Sugar Rush contains medium hexagonal glitters in lime green, peach, white, and mirrored silver. The glitters apply to the nail with ease, and this is one of my favorite polish combinations in the collection. I just love how fun this manicure is!

Milani – Sugar Burst Milani – Sugar Burst The pink version of Sugar Coated is Sugar Burst! I have one coat layered over Splendid Strawberry, and this is a great combination. No fishing for glitters needed, and I love the light pink glitters and holographic sparkle over a brighter pink shade. This manicure is perfect for Valentine’s Day!

Milani – Sugar High Milani – Sugar HighNext up is Sugar High layered over Colorful Coral. Sugar High contains small hexagonal glitters in dark blue, light blue, peach, yellow, and bright pink. This mix of colors looks great over an orange shade, and can definitely be used over a lot of different polishes for a new look every time. I also love the amount of glitters I can get with just one coat of Sugar High!

Milani – Sugar Cane Milani – Sugar CaneThe most unique polish in this collection is Sugar Cane. I have Sugar Cane layered over Vivid Violet. This glitter top coat contains blue and pink bar glitters, and small, medium, and large white hexagons. I did have to fish for the large hexagons, but the other glitters applied with ease. In fact, I got tons of bar glitters! Sugar Cane is really funky, and I definitely have nothing else like it!

Milani – Sugar Rim Milani – Sugar RimLast but not least is Sugar Rim, which I layered over Power Periwinkle. Sugar Rim contains red, yellow, and black grains, small light blue hexagons, and silver shards. I do wish that the silver shards were easier to get onto the nail, but otherwise this is an awesome glitter polish. I can see myself wearing this manicure more in the future for sure!

All in all, the glitters from the new Milani Gold Labels are just as awesome as the brights. I honestly cannot speak highly enough of this collection, especially of the $4.69 price tag. These polishes are definitely fabulous and affordable, and can be combined in a variety of ways. All the Milani Gold Label Specialty Nail Lacquers will be available at CVS starting in February. Let me know which of these polishes is your favorite in the comments!

The products in this post were provided for my unbiased review. This post contains an affiliate link. All opinions are my own. See my Disclosure Policy for more information. 

New Milani Gold Label Specialty Nail Lacquer for 2014 | Part 1 of 2

Happy Friday! With the new year comes new nail polishes, and I am just drooling over the new Milani releases. I will have several Milani posts for you in the coming days, but first up is part one of the Gold Label Specialty Nail Lacquers. I am seriously loving all of these bright, creme shades. Let’s jump right into the polishes!

Milani – Showy Sea-Green Milani – Showy Sea-GreenFirst up is Showy Sea-Green, a true green nail polish. Showy Sea-Green is a mix of sea foam green and tree green for me, but whatever the hue, I’m loving this polish! The formula is good, and opaque in two coats. I am a huge green nail polish fan, and I can’t wait to wear this one throughout the spring and summer.

Milani – Popping Pink Milani – Popping PinkNext up is Popping Pink, a neon pink polish. Popping Pink is beyond flawless. The formula is great, it’s opaque in two coats, and the color is amazing! I might be a bit obsessed with neon pink, but if you are, too, Popping Pink is a must! I can guarantee you that this is my new go-to polish.

Milani – Splendid Strawberry Milani – Splendid Strawberry Splendid Strawberry is also a bright pink, but with a bit more of a red pigmentation to it. Just like all these polishes, Splendid Strawberry has a great formula that is opaque in two coats. It really stands out against my fair skin tone, and I think Splendid Strawberry would look great on anyone!

Milani – Colorful Coral Milani – Colorful CoralIf you love orange nails, check out Colorful Coral! This is a bright orange polish with an excellent formula. It’s opaque in two coats, and is super cheerful. Colorful Coral is definitely a wearable orange shade. Plus, it’s perfect for nail art!

Milani – Vivid Violet Milani – Vivid Violet Next up is Vivid Violet, a bright, lilac purple polish. Vivid Violet has a great formula, and is opaque in two coats. I love that a lighter hued purple is turned into a bright shade with this polish. While I love pastels, it’s nice to have a sharp lilac shade, too. Vivid Violet is a great addition to any polish collection!

Milani – Power Periwinkle Milani – Power Periwinkle Last but not least is Power Periwinkle, a gorgeous periwinkle blue polish. Power Periwinkle’s formula is amazing, and applies like a dream. I used two coats, and I’m loving it! Just like Vivid Violet, Milani has turned a usually pastel shade into a bright color. Power Periwinkle is great for the colder months, as well as the spring and summer!

All in all, I am really impressed with these new Milani Gold Labels. Not only are the formulas awesome, but the colors are right up my alley. If you love brights as much as I do, these are a great addition to your collection. These polishes will be available at CVS stores starting in February for just $4.69 each. Stay tuned for part two of this collection, and other Milani beauties!

The products in this post were provided for my unbiased review. All opinions are my own. See my Disclosure Policy for more information. 


Earthy Nail Art featuring Born Pretty Store Nail Stones & Zoya Naturel Collection

Happy Wednesday! I’ve got something a bit different on Adventures in Polishland today, and that is a nail art look that I created for the Born Pretty Store Year End Nail Art Contest. Born Pretty sent me the nail art stones so I could review them and put together a look for the contest, and I felt quite inspired. Let me show you the manicure I put together!

Born Pretty Store Nail StonesHere is what the Nail Stones look like – you can see them above on the business card. These stones are made of cabochon, and are a beautiful, marbled tan color. You can get five of these stones on Born Pretty’s website HERE for just $0.99! Since these stones remind me of the earth, so I grabbed the Zoya Naturel Collection to create my nail art look!

Earthy Nail Art Earthy Nail ArtHere is my completed nail art look! I knew I wanted to highlight the nail stones as double accent nails, and then I just went from there. To keep with the rounded visual of the stones, I chose to do a cloud design on the other fingers.

Here is a breakdown of my manicure:

  • Cloud Nails – base of Zoya Taylor, then Zoya Odette and Zoya Rue respectively.
  • Accent Nails – base of Zoya Brigitte, then nail stone in center of nail. Zoya Rue placed around half of the stone, one nail on top, the other on bottom.

Earthy Nail ArtThis manicure was surprisingly simple to create! To apply the nail stones, I simply pressed them into my nail polish when it was still tacky, and then applied top coat. For more information on how to create a cloud manicure, take a look at THIS Pin that I used as a guide. Not only are the nail stones easy to use, but they can be reused as well! Talk about a bargain!

All in all, I am absolutely loving this earthy nail art look! The Zoya Naturel Collection goes perfectly with the nail stones, and I feel like my nails look fancy yet not crazy thanks to the subdued color palette. As always, you can find great nail art supplies on the Born Pretty Store website for amazing prices and free international shipping. For an even better price, use code FZL91 for 10% off. You can also enter the Born Pretty Store End of Year Contest if you’d like – full details HERE. Let me know what you think of my nail art in the comments!

Born Pretty Store | Adventures in Polishland

The products in this post were provided for my unbiased review. This post contains affiliate links. All opinions are my own. See my Disclosure Policy for more information.

Review & Giveaway | Chrome Girl Nail Lacquer

Happy Monday! I’ve partnered up with the awesome online retailer Planet Beauty to bring you another great review and giveaway. This time I’m showcasing a new-to-me nail polish brand called Chrome Girl. Launched in February of 2013 by two girlfriends, Chrome Girl is 4-Free and Made in the USA. Let me show you these beautiful polishes, and stay tuned for the giveaway at the end!

Chrome Girl Nail Lacquer First, I wanted to highlight the Chrome Girl bottles. I love the rectangular shape, and despite looking smaller than your average bottle, these are full size at 0.5oz. These bottles are going to be so easy to store, and I even love the silver font on the front. Packaging isn’t the most important thing about nail polish, of course, but I’m loving the unique Chrome Girl bottles.

Chrome Girl – 2gether Forevs Chrome Girl – 2gether ForevsThe first Chrome Girl I tried is 2gether Forevs, a lilac purple creme polish. 2gether Forevs has a dream formula that is opaque in two coats. I wore this polish for four days without top coat and only experienced slight tip wear. I highly recommend 2gether Forevs for sure!

Chrome Girl – Pucker Up Chrome Girl – Pucker UpNext up is Pucker Up, a bright pink creme polish. Pucker Up also has an amazing formula, and I applied two coats to achieve opacity. While not a very unique shade, I don’t think you can ever go wrong with a bright pink. I own quite a few in my collection, and I’m so glad to add this to the pile! Plus, it’s a great Valentine’s Day color!

Chrome Girl – Birthday Suit Chrome Girl – Birthday SuitLast but not least is Birthday Suit, a pastel pink creme polish. Birthday Suit has a good formula, and I suggest careful application to avoid any streaking since this shade is so light. I applied two coats to achieve opacity, and I’m liking the result! Birthday Suit reminds me of a ballerina, and I think it’s so feminine. If you’re looking for a great, work appropriate polish, I think Birthday Suit is a great choice!

GIVEAWAY

Planet Beauty is kindly sponsoring a giveaway! One of you will win three Chrome Girl polishes. Please read the Terms & Conditions in the Rafflecopter widget below before entering. Good luck!

a Rafflecopter giveaway

Chrome Girl polishes can be purchased on Planet Beauty’s website HERE for $10 each. For a limited time, all orders over $34 receive free shipping throughout the United States!

The products in this post were provided for my unbiased review. This post contains affiliate links. All opinions are my own. See my Disclosure Policy for more information. 

Subscription Sunday | January Birchbox

Happy Subscription Sunday! Today I’m excited to share with all of you my January Birchbox. It was quite heavy when it arrived in the mail, so I couldn’t wait to see what was inside. If you’re new to Birchbox, it’s a $10 per month subscription service that sends out around five deluxe samples to you every month. The box mainly contains beauty and skincare items, but other goodies show up every once in a while as well. I am a huge Birchbox fan, and continue to receive it every month after canceling a lot of other subscription services. Let me show you what I got this month!

Subscription Sunday | January BirchboxEvery month, Birchbox focuses on a new theme. In January, it’s Go Time! Birchbox is encouraging all of us to try new things this year, and really dive into some adventures. Sounds like a motiving way to begin 2014!

Birchbox Products January 2014Here are the first three products in my box. I’ll describe them from left to right, and let you know the retail value of each sample.

  • Fekkai Brilliant Glossing Créme – $8.00 – I’m excited for this sample! Not only is it a great size and value, but I need something like this for my hair. This glossing créme tames frizz and adds moisture into the hair. I can’t wait to test it out!
  • Nail Rock Sequin Kit in Green – $7.00 – Birchbox always excites me with nail polish products! This kit comes with a nail sequin pot and a special base coat. This is a full size product, and I can’t wait to see how it works. Stay tuned for a full review!
  • Resist Ultra-Light Super Antioxidant Concentrate Serum – $4.58 – This serum really intrigues me! It’s designed to tighten pores, and also has anti-aging qualities. I’ll definitely be sure to give it a try and see what happens!

Birchbox Products January 2014


  • Ahmad Teas Assorted Teas – $0.53 – As a lifestyle extra this month, Birchbox included three tea bags from Ahmad Tea. I seem to get a lot of tea from Birchbox, and I like it, especially in the winter. The three flavors I received are Mint Mystique, Apricot Sunrise, and English Tea No. 1. I hope they’re tasty!
  • 100% Pure French Lavender Hand Buttercream – $1.01 – The last product in my box was actually three foil packets of this hand cream. I thought that was pretty interesting, but I do appreciate getting three packets instead of just one. Even though it’s a low retail value, I can pop these in my purse for when I need moisture on the go!

Birchbox Postcards January 2014As a final bonus, Birchbox included a set of five, inspirational postcards. Each contains a cute quote on the front, plus tips on achieving your New Year’s Resolutions on the back. These are great to hang up, include in your journal, or send to friends. I love them!

TOTAL RETAIL VALUE: $21.12

RATING 1-5 (1 BEING WORST AND 5 BEING BEST): 4

OVERALL OPINION: While the retail value of this box may not be very high, I can and will use each and every product in this box. I would prefer to not receive foil packets, but I will give Birchbox props for at least providing multiples instead of just one. I am very excited about the Fekkai Brilliant Glossing Créme and the Nail Rock kit. Plus, any time Birchbox includes a little bonus I am a satisfied customer!

Are you a Birchbox subscriber? If not, join HERE for just $10 per month. If you are, let me know what you got this month in the comments. I hope your 2014 is off to a fantastic start!

This post contains affiliate links. Birchbox purchased by me. All opinions are my own. See my Disclosure Policy for more information. 


Dare to Compare: Maybelline Baby Skin vs Too Faced Primed & Poreless

Too Faced Primed & Poreless vs Maybelline Baby Skin

Happy Friday! I was so excited when I saw that Maybelline released the new Baby Skin Instant Pore Eraser, and knew I just had to pick it up. If you’ve been following my blog for a while, you’ll know that I just love Baby Lips, so my fingers were crossed that Baby Skin would be just as great. After trying it out, I couldn’t believe how much I liked it, and how similar it is to the Too Faced Primed & Poreless primer that I use every day. Today’s post is going to compare these two primers, and see which one is the best option.


MAYBELLINE BABY SKIN

Maybelline Baby Skin

Price: $6.99 (or $10.43 per oz) [BUY]

TOO FACED PRIMED & PORELESS

Too Faced Primed & PorelessPrice: $30 [BUY]

SIDE BY SIDE

Baby Skin vs Primed & PorelessAs you can see from the swatches, the main difference between Baby Skin and Primed & Poreless is the formula. Baby Skin has a clear gel formula, and Primed & Poreless starts out as a nude tone with an almost lotion-like formula that becomes invisible once applied to the skin. Baby Skin is a bit thicker in consistency, but after application both are extremely similar. Are you ready for the results?

Baby Skin vs Primed & PorelessVoila! I seriously cannot tell the difference between these two primers! Once applied they both have the same exact smoothing effect on the skin, and both are amazing primers to wear under foundation. I find that both Baby Skin and Primed & Poreless last just as long throughout the day, and my foundation glides over each with ease during application. The only real difference in wear between the two is that Primed & Poreless is definitely better on its own than Baby Skin. Thus, if you’re looking for a primer that you can wear alone on no makeup days, I would recommend Primed & Poreless. Otherwise, Baby Skin is just as amazing as the high end primer I’ve spent a lot of money on!

All in all, I’m so glad I’ve discovered Baby Skin! I still love my Primed & Poreless, but will definitely be reaching for Baby Skin on days that I’m wearing makeup. Thanks to Maybelline for creating an affordable primer at the drugstore! I will be sure to stock up during sale events. Let me know in the comments what your favorite face primer is, and if you’ve tried Baby Skin yet!

This post contains an affiliate link. All opinions are my own. See my Disclosure Policy for more information. 


Let Your Natural Beauty Shine in 2014 with L’Oreal Products! #WalgreensBeauty

CB Disclosure White Background 600 px wide

Happy Sunday! Today I am excited to share with you some great products from L’Oreal that are all new to me. Adventures in Polishland is all about being fabulous and affordable, and everything in this post sure fits that description. I headed to Walgreens to check out the L’Oreal section, and got some great deals along the way. I had my eye on the brand new Voluminous Butterfly Mascara, and of course picked up some other goodies as well. Let me show you the makeup and nail looks I created, to share how to be beautiful in 2014!

Let Your Natural Beauty Shine in 2014 with L'Oreal Products! WalgreensBeauty #shop #cbias

MAKEUP TUTORIAL

My first aim was to create a new makeup look that let my natural beauty shine. If you’ve followed my blog for a while, you know that while I love trying out new makeup trends, I typically stick to the basics. If you’re looking for a more natural look in the new year, here are a few makeup tips I have for you!

STEP 1 – A FLAWLESS COMPLEXION

L'Oreal Paris Magic Nude Liquid Powder #WalgreensBeauty #shop #cbias
L'Oreal Paris Magic Nude Liquid Powder Swatch #WalgreensBeauty #shop #cbias

L’Oreal Paris Magic Nude Liquid Powder – 312 Classic Ivory – $12.99

I always like to use some sort of foundation just to ensure my skin is looking clear and even. I’ve been intrigued with the concept of the Magic Nude Liquid Powder since it was first released, and just had to try it! This foundation goes on like a liquid and dries to a powder finish. Just shake the bottle, tap a few drops into your hand, and rub it onto your face like a lotion. I was skeptical, but it works! I get a gorgeous, natural finish that lasts all day! I’m so impressed with this foundation, and highly recommend it.

STEP 2 – AWESOME EYELASHES

#WalgreensBeauty #shop #cbias
I found the Voluminous Butterfly Mascara right away! My store had a lot in stock!

#WalgreensBeauty #shop #cbias 
#WalgreensBeauty #shop #cbias

L’Oreal Paris Voluminous Butterfly Mascara – Blackest Black – $8.99

L’Oreal just released the Voluminous Butterfly Mascara, and as soon as I saw the unique applicator I couldn’t wait to give it a try. I rarely like a mascara upon the first use, but I am blown away with this one! Not only does it grab onto each lash to separate and lengthen, but it truly curls the lashes into a beautiful, winged out look. The formula is great, and I experienced no clumping whatsoever. I also like that this mascara is ophthalmologist tested, and safe for even those with sensitive eyes. I’ve definitely found my new favorite mascara!

STEP 3 – LUSCIOUS LIPS

#WalgreensBeauty #shop #cbias

L’Oreal Paris Colour Riche Lipcolour – 174 Rose Taffeta – $9.99

The last step in this makeup look is a bit of lipstick. Despite what other makeup you may (or may not) be wearing, lip color can really change up your look completely. I grabbed a nice pink shade that isn’t too bright to ensure my lips would look polished yet still natural. I’m loving Rose Taffeta! The formula is moisturizing and easy to apply. Plus, the shade is quite wearable.

COMPLETED MAKEUP LOOK

#WalgreensBeauty #shop #cbiasMANICURE

#WalgreensBeauty #shop #cbiasOf course, I had to pick up a couple L’Oreal nail polishes at Walgreens, too. I spotted the limited edition The Magic Top Coats display, and grabbed The Holographic. Then I headed to the permanent display to pick up a color to go with my new top coat.

#WalgreensBeauty #shop #cbias #WalgreensBeauty #shop #cbiasI began with L’Oreal in Paparazzi Pleaser, a purple creme polish that has a hint of blue to create a dustier shade. I applied three coats for the look in the photos, and I’m loving this color for winter. It’s not too “out there,” but it’s different than a neutral or pink. Paparazzi Pleaser also pleases Adventures in Polishland!

#WalgreensBeauty #shop #cbias #WalgreensBeauty #shop #cbias #WalgreensBeauty #shop #cbiasTo complete the look, I applied two coats of The Holographic, a flakie top coat. I have never worked with a flakie before, but it is quite like a glitter top coat, just with flakes of holographic leaf in place of glitters. I was surprised with how chunky The Holographic is, but it definitely looks neat. I had a difficult time capturing just how holographic my nails look in person, but the last picture gives you an idea of the reflective shine. It’s really cool!

L’OREAL PARIS BUTTERFLY MASCARA LAUNCH EVENT

Join L’Oreal and Walgreens on Wednesday, January 15 at the Walgreens in Times Square from 11:00am–3:00pm! Get an eye makeover in-store, and pick up the new mascara! This is sure to be a fun experience, and I just know you’ll love the mascara!

GIVEAWAY

Last but not least, L’Oreal is also providing one of you with the Voluminous Butterfly Mascara! Please enter using the Rafflecopter below, and ensure you read all of the Terms & Conditions written in the widget.

 a Rafflecopter giveaway


My First Manicure in 2014 featuring JulieG Silver Bells!

Happy Wednesday! I’m back today with a new blog post after not polishing my nails for over two weeks! The holidays were just so busy that once I took off my old manicure, I decided to take a bit of a polish break. Soon I’ll be testing out all sorts of new polish goodies for the new year, but to break my polish hiatus, I grabbed one of the Holiday Frosted Gumdrops from JulieG. Let me share my first manicure of 2014 with you!

JulieG – Silver Bells JulieG – Silver BellsJulieG Silver Bells is a silver nail polish with silver glitters and a textured finish. The formula was good and manageable, but a bit on the thick side. I suggest three thin coats for full opacity, as I wore for my manicure. Silver Bells dries very quickly, and looks stunning! I’m not usually a huge silver nail polish fan, but the sparkle in Silver Bells makes it wearable and perfect for winter.

JulieG – Silver Bells All in all, I’m really liking Silver Bells, and I’m glad it got me out of my nail polish funk! I’m excited for the coming year, and can’t wait to continue trying and testing more nail polish and beauty products. I hope you’ll join me on my Adventures in Polishland as I soar into my second year of blogging!

You can purchase JulieG polishes for $3.99 at your local Rite Aid or on the Jesse’s Girl website HERE. I purchased mine from Groupon!